Minimizing Noise Through Walls
Dogs barking, neighbors yelling, loud music playing and traffic blasting by - these are all things that can be a real nuisance, causing stress and sleeplessness. If you're living in a home where these sound disturbances occur, finding ways to soundproof your living space can add significantly to the quality of your home life.
What's Letting All That Noise In?
Sound travels in waves and is transmitted through the air to our ears. All sound that we hear is classified as airborne sound, such as music coming from a radio, but may also be called structural sound, such as footsteps on the floor above or someone knocking at the door. These structural sounds are transformed into airborne sounds, which is what we hear.
Sitting in our homes, we may be inundated by sounds through a variety of means. They may come from outside through our doors, windows and walls, and from inside through our floors, ceilings, doors and interior walls. Sound waves reach us by following the path of least resistance. This could be around the perimeter of a door or window, through an uninsulated electrical outlet or through an air conditioning or heating duct/vent. Sounds also transfer through the solid structures of your home, such as the actual doors, windows and walls. In the following, we'll concern ourselves specifically with ways to minimize noise coming through walls.
How To Reduce Noise Between Rooms
Anyone living in an area where temperatures drop during winter months knows that the first line of defense against a chilly abode is to insulate the walls against the cold. This will also help keep your house cooler during the summer months. By insulating all the nooks and crannies that exist between the exterior and interior walls of your home, you're helping block temperature transference. The same holds true for sounds that, like heat or cold, travel along and through the paths of least resistance.
Start With Soundproofing Walls
While complete soundproofing should include walls, floors, doors, ceilings and windows, you should start with the walls, both interior and exterior. Soundproofing during initial construction is usually easier and cheaper than with a remodel, but good results can be obtained with either method if properly done. Effective soundproofing of walls can be achieved through several means and some are a bit more labor-intensive than others.
One simple way of doing this is by using our Mass Loaded Vinyl Noise Barrier (MLV). Flexible, limp and heavy, this specially designed material is incredibly effective at blocking, absorbing and deadening sounds. It has numerous applications and is easy to use – especially important for DIYers. This method isn’t as visually appealing as other options but can satisfy your need for quiet. Read more about Mass Loaded Vinyl (MLV) here.
For optimal soundproofing, the wall cavity should be completely filled with quality insulation, including all gaps and spaces between studs. This will also improve the fire safety rating of your home, serving as a means for slowing fire travel within walls. Properly insulating walls for soundproofing should include filling any gaps that could allow sound transference, such as electrical outlets, switches and even nail holes that may have been made for hanging pictures, etc. If you are building a new home or renovating, taking extra care during construction to ensure proper soundproofing throughout the process will make things easier (and quieter) in the long run.
Recommended Installation Procedure:
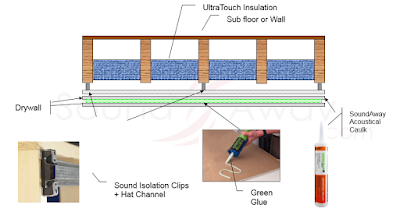
- Demo existing walls, if required. You want to have any sheetrock removed and frame exposed.
- Install UltraTouch Denim Insulation
- Install IsoMax Sound Isolation Clips
- Insert Hat Channel
- Attach a layer of 5/8” drywall leaving a perimeter gap not to exceed 1/4”
- Fill gaps with Acoustical Caulk Sealant , applying a 1/4” bead of along edges of sheetrock and bevel edges of butt ends.
- Apply Green Glue to a second layer of 5/8” sheetrock, at a rate of 2 tubes per 4x8 sheet. Offset the seams of the second layer from those of the first layer and fasten to Hat Channel, pressing firmly.
- Finish as desired
This is a common sound isolation system for minimizing noise through walls and ceiling and is found to be a highly effective solution to lowering both structural and airborne noise. Our expert team is always happy to help guide you through making your selection – let us know how we can help!

