How To Install Kinetics IsoMax Clips on Ceilings & Walls
Installing the
Kinetics IsoMax Sound Isolation Clips and Hat Channel is a simple process, but we all know that instructions can often be a bit tricky to make sense of. Below, we have broken this process down into simple steps for an easy-to-follow guide.
With these simple steps, you can forgo the difficult installation process associated with the standard resilient channels while protecting against inadvertently screwing through the furring channel and into a joist or stud when installing the drywall for optimizing wall and ceiling noise isolation.
Materials Needed:
Simple Steps:
 1) Determine where you will be installing: wall or ceiling; and keep in mind that these clips are low profile to avoid taking up unneeded space.
2) Use a 4’ level to assess and mark your anchor locations, keeping in mind a few things:
- Hat channel will be placed perpendicular to studs or joists
- Vertical spacing between each channel should be 24" on center.
- Horizontal distance between each clip should not exceed 48”
- Channels must be overlapped a minimum of 6” to extend the length along long walls/ceiling to accommodate your needs
For Wall Installation:
- The bottom row of Hat Channel should be a maximum of 3" from the floor to the center of the clip
- The top row of Hat Channel should be a maximum of 6" from the ceiling
For Ceiling Installation:
- The clips should be attached within 12 inches of perimeter and at the end of the furring channel
- The outer hat channels should be a maximum of 6" from the perimeter
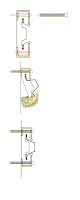
- Secure the clips with a single screw (Tapcon for Masonry), beginning with one end only (reference image at left). Anchoring Recommendations: Wood or Drywall + Studs - #8 x 2-1/2" coarse thread screws
- Steel - #8, 10, or 12 x 1-5/8" self-tapping Type S screws
- Concrete or Masonry - 3/16" dia x 2-1/4" Tapcon or equal anchor
3) Insert the hat channel into the clip that is attached and place the other end of the hat channel in place before securing the second end with a single screw or Tapcon (for masonry)
Kinetics IsoMax Clips Product Information:
- Reduces Structure Borne Sound Transmission
- Weight Capacity: 36 lbs. per clip
- Performance Range: STC 57 to STC 64 in lab tests
- UL fire-rated for wall and ceiling assemblies
Our team of Sound Isolation
experts are always happy to answer any questions that come up through the installation process, just give us a call at
866.768.6381.


